Reupholstery 101
Here is a small How To on reupholstering a chair. This will guide you through a beginners project. Sewing skills will be required for this project. This is a beginner project due to the face that we are only replacing the fabric, there is no need to replace the springs or do any repair to the frame. With a beginner project you should not need to replace the foam, if the foam is no longer useable you may need to cut and form the new padding.
This chair was my grandmothers! She had this chair since I could remember so it was really important to me. I wanted to fix it up now that the fabric, once rust shag, had turned to a matted mess with spilt seams.
Step 1
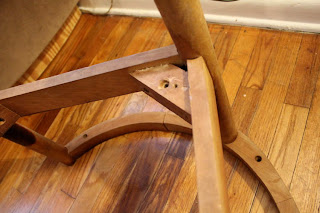
Unscrew the pads from the frame
I had to turn the chair upside down to access the screws
I started with the top pad first then the seat pad
Keep all the screws in a safe place
Step 2
Remove the fabric from both pads
I had to remove staples using a flat head screwdriver and plyers
Tip 1
Use a marker to label the fabric pieces after removing them so not to get anything mixed up
Also label top or bottom so not to flip any pieces
This is the seat frame
The springs are in great shape so they don't need to be replaced
Inspect the foam or padding to determine if it is still usable.
My foam was not usable so I had to replace it
Optional Step
If foam is to be replaced, pads can be bought in various sizes from a fabric store or online
I cut my own foam due to the shape of the chair
Step 3
Working on the top pad first
I took the old fabric that still had its original shape to make the pattern for the new fabric
You can do this by laying the old fabric on your patterning paper and tracing the individual pieces
Cut out pattern then cut fabric
Tip 2
When patterning upholstery, add 1" seam allowance
Optional Step
Sew pattern pieces using the 1" seam allowance
Some fabric pattern pieces will not need to be sewn together
Just cut and staple in place
Because I had to replace the foam I also had to use foam that was no factory shaped for this chair
Due to this I had to cut an extra layer of fabric for the top pad
Using this fabric to hold the foam in place and to keep the shape will take the strain off of the outer fabric
Step 4
Staple your new fabric to the same areas that you removed the old staples
I started by stapling the inside edge first, then wrapped the fabric around the frame and foam
Then stapled the opposite fabric edge
This keeps the fabric and foam even
Optional Step
I needed to repeat this set by stapling the outer fabric down around the inner fabric
This will be much easier now that the inner fabric is holding everything in place
Optional Step
Now working on the bottom pad
Use the wood frame for the bottom to trace out the new foam and cut out
Step 5
Working on the bottom pad
Use the wood frame for the bottom pad to trace you bottom fabric pattern
Or you could use the old fabric to measure and trace your new pattern
Don't forget to add 1" seam allowance!
For this patter I needed to measure the width of the foam padding, the wood frame and add seam allowance in order to get the width of the strip of fabric that runs all the way around the base of the seat
Tip 3
Dont forget that the cushion needs to be tight!
You don't wants the fabric to be loose when you sit on the seat
So when measuring the width of the fabric keep this in mind
As well as the length of the strip by measuring the circumference of the wood base
Step 6
Cut out pattern and then fabric
Optional Step
Sew fabric patten together if needed
Step 7
Staple new fabric to wood frame over the foam
I start by dividing the circle into four sections
Tacking down with one staple at one section then go to the opposite side a tack down with another staple and so on
This will keep the fabric even all the way around
If you just work all the way around you could end up uneven and the cushion will look lopsided
Step 8
Cut out bottom lining for bottom pad to conceal springs and the top fabrics unfinished edges
Use the same patten piece used for the top of cushion
Step 9
Staple down lining over the top fabric
Step 10
Screw pads back on the chair frame
Step 11
Making fabric ends that will conceal the unfinished fabric edges on the top pad
Measure the chair end to find what size the finished ends will be
Step 12
Use cardboard to make these new ends
Step 13
Cut out cardboard and fabric
remember that the fabric cut out needs 1" seam allowance
Step 14
Use a hot glue gun to glue the fabric to the cardboard
Step 15
Glue trim around your new ends
Step 16
Tack your new ends to the chair using nails that have a small head
This is so you can pull the fabric over the nail once its in place
Ta Da!
This chair has been in my family since 1967! It is one of two, the other did not survive so it was really important to me to restore this one. I recovered it with fabric from the 1980's
that I found in my mothers attic.
I hope this helps you with your next project!


